My little spot in the craft blogging world!

September 21, 2011

Bottlecap Necklaces

I have seen these bottlecap necklaces here and there and thought I'd give them a try. They were much easier than I thought they would be! I whipped up several of them in no time. Here are just a few of the many I've made. I think these will be great sellers at my craft fair I'm doing in November. What a great gift for a teenager, coworker, babysitter, cleaning lady, teacher, etc. I will be selling these for $10 at my fair and here on my blog if any of you are interested. These can be custom ordered as well. Just let me know what you are wanting and I will see what I can do. Price will be the same regardless. Next I'll be working on packaging for them for those who buy any from here. For my craft fair, I think I will just sell them as is and have little cello bags or something to put them in. Email me if you are interested in purchasing one.


Thanks for stopping by!

Don't miss out on my September specials! For every $50 order you place, choose a pack of 8 1/2x11 cardstock any color FREE! Sign up to become a demonstrator on my team and choose any stamp set valued at $15.95 and under FREE! Hurry, these offers are only good until September 30th! Contact me today to take advantage of these offers.

Stamps: None
Ink: None
Paper: Various retired SU! DSP and Non SU! DSP
Accessories: bottlecaps, Crystal Effects, 1" circle punch, rhinestones, Dazzling Diamonds, jump rings, cording


September 19, 2011

Notepad Holder

Here is a cute little notepad and cover. This is a 3x5 notepad I found at Walmart. This will make a great stocking stuffer come Christmas! I plan on making several to give to coworkers, my son's teachers, etc. I think I'll add a little pen with them though. The cover is Old Olive with a piece of retired Christmas DSP and Very Vanilla layer of cardstock on top. The snowman is from the Punch Pals set as are the snowflakes. I added some Dazzling Diamonds to the flakes and made a little hill of snow under the snowman with it as well. I tied a piece of Very Vanilla grosgrain ribbon around it to keep it closed. I will be back later this week with the directions on how to make one.


Thanks for stopping by!


Don't miss out on my September specials! For every $50 order you place, choose a pack of 8 1/2x11 cardstock any color FREE! Sign up to become a demonstrator on my team and choose any stamp set valued at $15.95 and under FREE! Hurry, these offers are only good until September 30th! Contact me today to take advantage of these offers.

Stamps: Punch Pals
Ink: Basic Black, Versa Mark
Paper: Old Olive, Very Vanilla, Retired DSP
Accessories: Very Vanilla grosgrain ribbon, Dazzling Diamonds, 3x5 notepad


September 16, 2011

Musical Thanks

Here is a card I made for my son's piano/guitar teacher at the end of the year in June. All the parents chipped in and got her a gift card and I also made the card. I used the retired background stamp Musical Score, but you can easily use the Musical Notes wheel stamp in it's place. The base is Basic Black and I layered Whisper White on it. I tore all the edges of the white and sponged it with black ink. I took some of the 1 1/4" Basic Black stiped grosgrain ribbon and tied it around the middle. The gift card slipped under the ribbon on the inside of the card.


Thanks for stopping by!

Don't miss out on my September specials! For every $50 order you place, choose a pack of 8 1/2x11 cardstock any color FREE! Sign up to become a demonstrator on my team and choose any stamp set valued at $15.95 and under FREE! Hurry, these offers are only good until September 30th! Contact me today to take advantage of these offers.

Stamps: Musical Score (retired)
Ink: Basic Black
Paper: Basic Black, Whisper White
Accessories: 1 1/4" Basic Black striped grosgrain ribbon

September 14, 2011

Thinking of You

A teacher I work with found out last week that her mom has cancer. We all picked days to make her a meal and I offered to make the card. We want her to know we are all thinking of her and help ease some of the everyday burdens for her. The card is a 5x5 square base. This size fits perfectly into the SU! 5 1/2 x 51/2 square envelopes. Once I had the base made, I used my 1 3/8" circle punch to punch out the lower corner. I stamped the image from the Baroque Motifs set on Concord Crush, Poppy Parade, and Pear Pizzazz. I stamped the same image directly on the inside of the card, but where you can see it through the circle punch out. I then stamped my sentiment and punched it out with the 1 1/4" circle punch and used a dimensional to adhere it to the inside stamped image. The ribbon is the 1 1/4" striped grosgrain in Basic Black. I just folded it in half before wrapping it around my card.


Thanks for stopping by!

Don't miss out on my September specials! For every $50 order you place, choose a pack of 8 1/2x11 cardstock any color FREE! Sign up to become a demonstrator on my team and choose any stamp set valued at $15.95 and under FREE! Hurry, these offers are only good until September 30th! Contact me today to take advantage of these offers.

Stamps: Baroque Motifs, A Touch of Kindness (retired)
Ink: Basic Black
Paper: Whisper White, Poppy Parade, Pear Pizzaz, Concord Crush
Accessories: 1 3/8" & 1 1/4" circle punches, 1 1/4" striped grosgrain ribbon, dimensionals


September 12, 2011

Post It Note Holder

I'm taking a little break from Halloween projects. Today I have a couple post it note holders I made to sell at an upcoming craft show I'm doing. I used the tutorial here to make the actual holder. Again, I'm trying to use up my scraps, so the DSP is all retired and I honestly don't know which paper it is. I keep all my scraps together, not labeled. The pens are from the dollar spot at Target. Cute, quick, and great gifts to make. If you are interested in buying these, or would like to place a custom order with particulair colors or a theme, let me know. They sell for $4.00 plus shipping. For orders outside the US, I will get you a shipping quote.


Thanks for stopping by!

Don't miss out on my September specials! For every $50 order you place, choose a pack of 8 1/2x11 cardstock any color FREE! Sign up to become a demonstrator on my team and choose any stamp set valued at $15.95 and under FREE! Hurry, these offers are only good until September 30th! Contact me today to take advantage of these offers.

Stamps: None
Ink: None
Paper: Old Olive, Very Vanilla, retired DSP
Accessories: Simply Scored tool, sticky strip, post it notes, Very Vanilla satin ribbon, Old Olive Satin Ribbon, mini pens

September 9, 2011

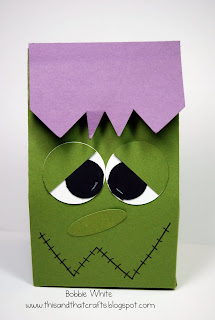
Frankie Box

Today I have a box, or is it a bag? I guess it's up to you as to what it is, I'll just call it a Frankie box. I used Old Olive cardstock for the box, Perfect Plum for his hair, Basic Black and Whisper White for his eyes. His eyes were made with various sized circle punches and I added the details to them with the Signo Uniball pen. I used an oval punch for nose and trimmed it down some so it wasn't so big. His mouth I just freehand drew. To close it, I attached a small velcro dot. Cute and easy - just my style! Now to fill it up with all kinds of yummy treats!


Thanks for stopping by!

Don't miss out on my September specials! For every $50 order you place, choose a pack of 8 1/2x11 cardstock any color FREE! Sign up to become a demonstrator on my team and choose any stamp set valued at $15.95 and under FREE! Hurry, these offers are only good until September 30th! Contact me today to take advantage of these offers.

Stamps: None
Ink: None
Paper: Old Olive, Perfect Plum, Whisper White, Basic Black
Accessories: 1 3/4, 1 1/4 circle punches, oval punch, Signo Uniball pen

September 8, 2011

More Halloween Treats

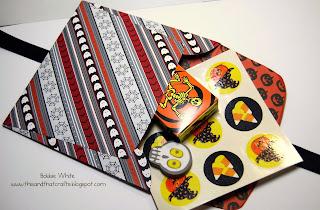
Here's another way to package your Halloween goodies. This uses the Candy Wrapper die - love it! I used Pumpkin Pie cardstock and wrapped it with some of my retired Halloween DSP scraps. I also punched a couple of the Bitty Bats out from the retired punch and used the sentiment from the Tiny Tags set and punched it out with the Jewelry Tag punch. If you don't have the Bitty Bat punch, or any of the retired items I happen to use, just use what supplies you do have in place of those. Don't let not having the exact item you see others use keep you from recreating something you like. Get inspiration from others and make it your own. Hope you're enjoying all the Halloween things I've been making. I'm enjoying making them! 

Thanks for stopping by!

Don't miss out on my September specials! For every $50 order you place, choose a pack of 8 1/2x11 cardstock any color FREE! Sign up to become a demonstrator on my team and choose any stamp set valued at $15.95 and under FREE! Hurry, these offers are only good until September 30th! Contact me today to take advantage of these offers.

Stamps: Tiny Tags
Ink: Basic Black
Paper: Pumpkin Pie, Perfect Plum, Basic Black, retired Halloween DSP
Accessories: Big Shot, Candy Wrapper die, Bitty Bat punch (retired), Jewelry Tag Punch, dimensionals

September 7, 2011

Repurposed Priority Boxes

I saw this idea somewhere, but can't for the life of me remember where! I took the medium priority boxes you can get from the post office (for free) and turned them into a mailbox I can use in my classroom to keep my daily papers organized. I took 4 of the boxes and adhered them together. You can either tape them or use some spray adhesive to do this, whichever you prefer. Once I had my mailbox put together, I took some white, craft acrylic paint and painted all the outside surfaces. When that dried, I used my ATG tape gun and adhered designer series paper to all the sides. The paper I used is from the retired Sweet Pea pack. Once I had my DSP on, it is ready to be used! It wasn't hard at all to do. Just a little time consuming because I had to let the paint dry. A great way to reuse something you have laying around the house and stay organized at the same time! The great thing about this project is you can customize it to fit your needs. You can add more boxes, or use fewer. Hope you'll give it a try!


Thanks for stopping by!

For every $50 order you place with me, you get your choice of  an 8 1/2" x 11" pack of cardstock FREE! Hurry, this is a limited time offer. Join my team in September and you can choose any $15.95 or under stamp set from the 2001-2012 Catalog for FREE! My gift to you just for becoming a demonstator. Contact me today to learn more about all the benefits there are to being a demonstrator.

Stamps: None
Ink: None
Paper: Sweet Pea DSP (retired)
Accessories: Priority boxes from post office, adhesive, craft paint (all non SU!)

September 6, 2011

More Halloween Goodies

Here are some more treat bags I made. This time I used the Fancy Favor Bigz XL die and the Batty for You stamp set. For the handle I used some retired jute rope and punched holes with my crop a dile. Again, something quick and easy that you can whip up in no time.


                                                              Thanks for stopping by!

This and That Crafts September special: For every $50 order you place with me, you get a pack of 8 1/2x11 cardstock FREE! You choose the color! Contact me today to place your order and take advantage of this limited time offer.

Stamps: Batty For You
Ink: Only Orange (retired)
Paper: Only Orange, YoYo Yellow, Summer Sun (all retired)
Accessories: Big Shot, Fancy Favor Bigz XL die, 1 3/4" scallop circle punch, 1 1/4" circle punch, crop a dile, jute rope (retired)

September 5, 2011

Two Tags Halloween Favor

Here are some little treat holders I made for my son's class. They are made with the Two Tags die, the spiderweb textured impressions embossing folder, and a little sponging. I first ran my cardstock through the Big Shot in the Spiderweb embossing folder, then ran it through again using the Two Tags die. Very simple to do. Once I had them all cut out, I took my sponge dauber and sponged a little ink on it to bring out the spiderweb even more. I used a glue dot to keep the bag of Skittles in place and tied each up with some ribbon I had in my stash. Try some of these for yourself! Great to give trick or treaters, kids at your church, school, play dates, etc. Hope y'all are having a great Labor Day Weekend!

Thanks for stopping by!

Don't forgot my September special. For every $50 order you place with me, you get a free pack of your choice of color 8 1/2"x11" cardstock. This special is only good until the end of the month though, so don't wait, order now!

Stamps: None
Ink: Pumpkin Pie, Whisper White craft
Paper: Pumpkin Pie, Basic Black
Accessories: Big Shot, Two Tags Die, Spiderweb embossing folder, Bitty Bat punch (retired), sponge daubers, glue dots, ribbon (non SU!)

September 2, 2011

A Scrappy Kind of Card

Do you have a ton of scrap paper laying around? I do and they are taking over my crafting area! This card shows a great way to use up some of those scraps. I know you've all seen these "quilt" cards before, but I thought I'd share it anyway. I chose a Halloween theme and used up some retired DSP scraps I had laying around. I honestly don't remember what the name of the DSP was, sorry. To make a quilt card, punch 1" squares out of your scraps. Adhere them to a piece of cardstock and run it through the Big Shot using the top note die. Add some faux stitching with the Signo Uni-ball pen and wah-lah, a quilt! Very easy and I love the way it turns out. The ribbon is just some I had in my stash and is non SU!


Thanks for stopping by!

You can now order from the new Holiday mini catalog! It is to die for! Contact me to place your order today. For every $50 order you place between now and September 30th, you will get to pick a free pack of 8 1/2x11 cardstock of your choice. Hurry, this is a limited offer!

Stamps: None
Ink: None
Paper: Basic Black, various retired DSP scraps, Whisper White
Accessories: Big Shot, Top Note die, Signo Uni ball pen, ribbon

August 31, 2011

Halloween Treat Pouch

I'm still working on treat bags for the kiddos in my class for Halloween. While blog surfing the other day I found this cute idea from Heather Nichols over at Papertrey Ink. This was really easy to make! I used a 5x5 square envelope from SU! and tore it apart to use as a template. Our square envelopes only come in white and I didn't think that worked for Halloween. Once I had my template, I simply laid it on a piece of Frightful Sight DSP and traced it. Then I cut it out, added some adhesive, and made a whole new envelope! For the flap I used a piece of Cajun Craze for a little contrast. When putting your ribbon on, be sure you adhere it to the flap of your envelope before you add the contrasting cardstock or DSP. You want it to be under that piece so you can decorate the flap. I sponged around the edges of the flap with Cajun Craze ink too. To decorate the flap I used the new set Out On A Limb which will be in the new Holiday Mini available Thursday! You will definitely want to get your hands on this mini! The Eek! is also from a new set in the mini, It's a Wrap Holidays. These are quick and cute and can fit quite a few Halloween goodies in them! Try one for yourself. I'd love to see your creations!

Tomorrow is the last day to take advantage of the Stampin' Up! August promotion. Buy 3 packs, get 1 free DSP! Contact me today with your order!


Thanks for stopping by!

Be sure to check back Thursday! That is when the Holiday Mini goes live and you can start ordering all the goodies to make you Halloween, Thanksgiving, and Christmas items. Look for the catalog on the right sidebar! Tomorrow is the last day to order out of the Summer Mini. Get what you want before it's gone.

All Supplies SU!
Stamps: Out On A Limb, It's a Wrap Holidays
Ink: Cajun Craze
Paper: Cajun Craze, Frightful Sight DSP
Accessories: 5x5 Square envelope, Basic Black satin ribbon

August 29, 2011

Thank You Card for School Conselor

Here is a card I made for the conselor at my son's school to thank her for putting him with such great teachers this year. Last year he had a really rough year due to having several kids in his class that were behavior problems and a teacher who lacked structure and good behavior management skills. I met with the conselor during the year to discuss his placement for this year. She more than come through for him! He is with two fantastic teachers and has kids in his class, that like him, want to learn and love to learn. I thought I would send her a little thank you card because it means alot to me that she took everything we talked about into consideration when placing my son this year. I wanted to keep it simple, nothing too fancy since it is being mailed. It's hard to tell by the picture, but the flower has crystal effects on it and is very shiny. Isn't the card holder so cute? It is something demonstrators were able to purchase at convention this year at Memento Mall. Just another perk of being a demonstrator! Sorry the picture is a little dark. Not sure what happened there!


Thanks for stopping by!

Contact me if you would like to order Stampin' Up! supplies or if you would like to become a demonstrator yourself. I'd love for you to join my team!

Stamps: Button Buddies, Delightful Dozen, Sprinkles (retired)
Ink: Daffodil Delight, Cherry Cobbler
Paper: Cherry Cobbler, Whisper White, Basic Black
Accessories: Brights Buttons, Basic Black grosgrain ribbon, sticky strip, glue dots, crystal effects

August 26, 2011

Antibacterial Soap Teacher Gift

I always like to make a little something for my son's teachers when school starts. This year I didn't get anything ready in time for him to take on the first day, so I made something to thank them for a great first week. As a teacher it's always nice when you receive little notes and things from your students. The ones my student's draw themselves are the best! I got the idea for this cute little antibacterial soap holder from Erica Cerwin's blog Pink Buckaroo Designs. She is so creative! You can see her tutorial for this holder here.  For mine I used Pear Pizzaz cardstock for the actual holder. I then used the For The Teacher builder wheel in the Summer Mini on So Saffron cs. I cut a strip of Real Red cs and used the Tasteful Trim Bigz XL die for the Tempting Turquoise cs. The layout for the front of the holder comes straight from a card in the Summer Mini. I used the abc stamp from the Recess set in the Summer Mini as well. On the inside I kept it simple mainly because I was working on these late last night and wanted my son to take them today. I cut a piece of Just Add Cake DSP to the front of where the soap sits. If I had more time I probably would have added a little more bling! They were a big hit with his teachers, so I'm happy they liked them.


Thanks for stopping by!

Contact me to order Stampin' Up! supplies or to become a demonstrator yourself! Don't forgot, August 31st is the last day to take advantage of the buy 3 packs get 1 free pack of DSP! Stock up now for all your holiday crafting!

Stamps: Recess, For The Teacher Builder Wheel
Ink: Black Stazon, So Saffron, Pumpkin Pie, Tempting Turquoise, Old Olive, Real Red
Paper: Pear Pizzaz, So Saffon, Real Red, Tempting Turquoise, Just Add Cake DSP
Accessories: Big Shot, Tasteful Trim Bigz XL die, Sof Subtles buttons, linen thread, Oval punch, sticky strip

August 22, 2011

Halloween Treat Bag

Here is a bag I found while browsing on Pinterest. It is made with one 12x12 sheet of DSP. The paper I used is the Frightful Sight DSP in the new catalog. This isn't one of those little tiny bags, this thing is really a good size and can hold alot! I was thinking about making them for goody bags for my class, but they are too big. I don't think I could afford to fill 15 of them! So, I think I will use them as goody bags for my son's teachers. This is so easy to make! I will get directions up in the next couple days. This bag, I guess you would call it a bag, can be changed to any holiday or theme. I'll be back in the next day or so with some things I made for my son's teachers for back to school. 1 day of school down, only 186 more to go! :)

Remember, August 31st is the last day to take advantage of the buy 3, get 1 free packs of DSP!

ETA: Here are the scoring instructions to make the bag. Sorry it took me so long to get them posted. Have fun making one of your own!


Once you've scored all the sides, punch a hole in the corners with the diagonal crease and tie up with ribbon.


Thanks for stopping by!

Contact me if you would like to order Stampin' Up! supplies or become a demonstrator yourself.

Stamps: None
Paper: Frightful Sight DSP
Ink: None
Accessories: Basic Black satin ribbon, crop a dile, Simply Scored tool (available Sept. 1st)


August 21, 2011

I'll Be Back!

Just a quick note to explain why I've been MIA. School starts tomorrow and this past week has been all about getting things ready in my classroom, meetings, getting my son ready for school, and etc. I do have some new things to share with you and hope to have them posted tomorrow or Tuesday. I'm teaching full time this year, the first time in 10 years, so I'm sure I will be pooped out tomorrow night! I'm excited about this year though. My son is starting 4th grade and that makes me a little, well alot, sad. He's growing up way too fast! Those of you who are moms know how I feel. :(   Anyway, please stick with me as I will get back to my regular weekday postings. I just need to get back into the school groove!

Thanks for stopping by!


August 19, 2011

Sales Tax Holiday!

If you live in Texas, August 19th thru the 21st is the annual sales tax holiday on school supplies up to $100 per item.  Since many items from Stampin' Up! can be used for school, they are included in the sales tax holiday. No tax - whoo hoo!! It may not be alot, but every dollar helps. Remember, items on the list must be purchased during these dates. Also, any city, juridiction, or county taxes may not apply to the tax free holiday. Contact me if you would like to take advantage of this very limited time offer.

Tax Free Items:


100425
2-Way Glue Pen  $    3.50
100902
Dotto Refill  $    6.50
101879
Watercolor Pencils (24)  $   19.95
102845
Blender Pens (3)  $    9.95
103179
Craft & Rubber Scissors  $   19.95
103305
Dotto  $   12.95
103579
Paper Snips  $    9.95
103683
Mini Glue Dots  $    4.95
104045
Anywhere Glue Sticks (2)  $    3.95
104294
Sticky Strip  $    6.95
104331
SNAIL Refill  $    4.50
104332
SNAIL Adhesive  $    6.95
104430
Stampin' Dimensionals  $    3.95
105021
Uni-ball Signo Gel Pen  $    3.95
105394
Basic Black Stampin' Write Journaler  $    3.50
108360
Craft Scissors  $   29.95
110755
Multipurpose Liquid Glue  $    3.95
Varies
Stampin' Write Marker  $    3.50
119700
Subtles Collection Stampin' Write Markers (10)  $   28.95
119701
Regals Collection Stampin' Write Markers (10)  $   28.95
119702
Brights Collection Stampin' Write Markers (10)  $   28.95
119703
Neutrals Collection Stampin' Write Markers (8)  $   22.95
119801
2010-2012 In Color Stampin' Write Markers (5)  $   14.95
119802
Subtles Collection Watercolor Wonder Crayons (10)  $   16.95
119803
Regals Collection Watercolor Wonder Crayons (10)  $   16.95
119804
Brights Collection Watercolor Wonder Crayons (10)  $   16.95
119805
Neutrals Collection Watercolor Wonder Crayons (10)  $   16.95
120962
Stampin' Pastels  $   24.95
123002
2011-2013 In Color Stampin' Write Markers (5)  $   14.95

August 17, 2011

Baby Gift

A girl I work with is due with her 2nd baby in about a month. Since she pretty much has everything she needs, I kept her gift simple. I took a Mason jar and filled it with pacifiers. She's having a boy, so I picked ones in boy colors. I covered the lid and wrapped the sides of the lid with the retired specialty paper Nursery Suite. I also cut a piece of the same paper and wrapped it around the jar. I used the Scallop Circles #2 bigz die and the 3" cirlce bigz die to make a layer to put the baby tee stamped image on. The stamped image is from the jumbo wheel Baby Tees. I just cut the baby tee out I wanted to use and popped it up on dimensionals on the circles. I used watercolor crayons to color it in. I had a piece of craft wire and made it into the hanger. I tied a piece of the retired double stitched Baja Breeze ribbon around it to finish it off. I hope she likes it. You can never have too many pacifiers when you have a baby. They always seem to find the black hole where the missing sock mates go!


                                                               Thanks for stopping by!

 Contact me to order Stampin' Up! goodies or to become a demonstrator yourself and earn some extra money for the holidays!

Stamps: None
Ink: Black Stazon
Paper: Old Olive, Chocolate Chip (retired), Nursery Suite Specialty (retired), Whisper White
Accessories: Baby Tees jumbo wheel, Big Shot, 3" circle bigz die, Scallop Circles #2 bigz die, watercolor crayons, blender pen, dimensionals, Baja Breeze double stitched ribbon (retired), craft wire and pacifiers (none SU!)

August 16, 2011

Petal Cone Bat

I'm trying to get little treat holders ready for the kiddos in my classroom for Halloween. I used the Petal Cone Bigz die for the bat's body. I cut the flaps off and cut the bat shape at the top of the petal cone. I just freehand drew the wings. I used the Basic Rhinestone Jewels for the eyes and just colored them in with a Stampin' Write marker and heat set it. The fangs were drawn with the Uni-Ball Signo marker. I'm not sure I really care for this project. One, it's really small and doesn't hold much. Two, I think it's just....there. I'm sure everyone has projects they make and then when finished think, yuck! I guess it's back to the drawing board. I'll have another project for you tomorrow using some of our wonderful Designer series paper.


Thanks for stopping by!

Contact me to order any of the Stampin' Up! supplies you see used here or to become a demonstrator and join a fabulous company where you can work as much or as little as you want!

Stamps: None
Ink: None
Paper: Basic Black
Accessories: Big Shot, Petal Cone Bigz die, Stampin' Write marker, Uni-Ball Signo pen, Basic Rhinestone Jewels

August 15, 2011

Halloween means Candy Corn Time

I know, it's still August, why am I already posting Halloween stuff right? I'm trying to get a head start on my holiday cards, crafts, etc. Every year I wait until the last minute and I'm scrambling to get it all done. This year I'm determined to make the change! Anyway, on to the card. I got the idea to use the Petite Pennants Builder punch to make candy corn. I punched one triangle out of each of the Whisper White, Daffodil Delight, and Pumpkin Pie. I then just cut the pieces to make the candy and adhered them together. I used Linen thead to string them and hung them like a banner. For the pumpkins I used the Jack of All Trades set. This set is great because it can be used for both Halloween and Thanksgiving. I love having stamps, punches, etc. be so versatile. I used Tangerine Tango ink to stamp the pumpkins and then used the new Tangerine Tango embossing powder on them. I cut them out and popped them up on dimensionals. For the hat I stamped in Basic Black and then used black embossing powder on it and cut it out. It is also popped up on dimensionals. The embossing powder makes your images pop and adds that little bit of detail. The sentiment is from the Teeny Tiny Wishes set stamped in Old Olive.

Don't forget, August 31st is the last day to take advantage of the Buy 3, Get 1 Free on packs of DSP! Contact me today to get yours.


Thanks for stopping by!

Contact me to order any of the Stampin' Up! supplies you see used here or to become a demonstrator and get 20% off all your demonstrator orders!

Stamps: Jack of All Trades, Teeny Tiny Wishes
Ink: Old Olive, Tangerine Tango, Basic Black
Paper: Tangerine Tango, Basic Black, Old Olive, Whisper White, Daffodil Delight, Pumpkin Pie
Accessories: Tangerine Tango and Basic Black embossing powder, Linen Thread, Petite Pennants Builder Punch, dimensionals

August 12, 2011

Bah Bah Button Sheep Baby Card

I love the vintage look of this card. Not what I had planned for it, but that is where it went once I started. I got the idea for this card from a wall hanging on Pinterest. I used Crumb Cake for the base of the card. I used the Designer Buttons Neutrals for the body of the sheep and tied linen thread through each one. Whew! That took some time. Glad I was only making one of these! I just eyeballed how to arrange them so they looked somewhat like a sheep's body. I freehand cut the head, ear, and legs out of Early Expresso cardstock. I used my Uni-ball Signo gel pen for the eye and mouth. Once I got the sheep done, it needed something. So, I got out my sponge and lightly sponged Early Expresso ink all over the Crumb Cake cardstock. It gave it a really nice vintage feel. The sentiment is from the Family Phrases set. The ribbon is the retired Kraft taffeta.


Thanks for stopping by!

Contact me if you would like to order any of the Stampin' Up! supplies used here or to become a demonstrator!

Stamps: Family Phrases
Ink: Early Expresso
Paper: Crumb Cake, Early Expresso
Accessories: Designer Buttons Neutral, Linen Thread, sponge, Kraft taffeta ribbon (retired)

Buy 3 packs of Stampin' Up! DSP, Get 1 FREE!!!

Who doesn't love something free?! I know whenever I see the word FREE my ears perk up! LOL. Anyway, now through the end of August, you can get one pack of DSP free for every 3 packs you order. There is no limit, the more you order, the more you get free. I took advantage of the offer today and ordered myself some of the new paper in the catalog. If you would like to take advantage of this limited time offer, email me and I'll be glad to get your order in. My email address is on the left sidebar. Hope everyone has a great day! Please note: Specialty DSP is not included in this offer. What a great way to stock up for all those holiday crafts and card making!

August 10, 2011

Anytime Card

Inspiration for this card came from a card I saw in a Stamp It Cards magazine.  I used Whisper White for the base and layed a piece of Baja Breeze DSP on it. I rounded the corner on one side and distressed the opposite side. I then took some of the Whisper White and made polaroid frames. I stamped images from the stamp set Forever Young on Basic Black with Whisper White craft ink. I really like how this set lends itself to be either dressed up or down and can really be used for many occasions. The sentiment is from the set Touch of Kindness that is in the Summer Mini. Remember, you only have until August 31st to order from the Summer Mini!  I then layered the stamped images onto the white frames. To make the frames I just used my black Stampin' Write marker and a ruler. I tied some linen thread around the top and used the mini library clips to make the pictures look like they were hung up. I was in a hurry to finish this card and it shows! There are many little imperfections on it. Just don't look too close!  :)  The finished size of this card is 7 1/4" x 4".

                                                                  Thanks for stopping by!

Contact me to order any of the Stampin' Up! supplies you see used here or to become a demonstrator and get a 20% on every order you place! A great way to earn a little extra money for the upcoming holidays.

Stamps: Forever Young, Touch of Kindness
Ink: Whisper White craft
Paper: Whisper White, Basic Black, Baja Breeze DSP
Accessories: Corner rounder punch, Stampin' Write marker, linen thread, mini library clips

August 9, 2011

S'mores Goodies for Meet the Teacher Night

When the students in my class come for Meet the Teacher, I always like to have a little something for them to take home. The little something usually includes a treat and a project for them to work on. The treat they keep (of course) and the project is something they do and bring with them the first day of school. I find it gets them a little more excited about coming. For the treat this year I went with a s'mores goody. Since the theme in my room is camping, I thought s'mores would be perfect. I found these cute little tin buckets at the dollar spot at Target. I used the Under the Stars set to stamp the s'mores image. It is colored in with watercolor crayons and blender pens. I punched them out with the 1 1/4" cirlce punch and layered it with Early Expresso punched with the 1 3/4" circle punch. Those are both on the 1 3/4" scallop cirlce punch in Old Olive. I used the medium cello bags and tied some retired Chocolate Chip ribbon around the bag. Used linen thread to tie the smore's image on. I then used the Serif Essentials Bigz die to cut out each of the kiddos letter of their first name. That way they can pick the bucket with their letter on it when they come. Nothing fancy, but I think the kids will like them.


                                                    Thanks for stopping by!

Contact me to order any of the Stampin' Up! supplies you see used here or to become a demonstrator.

Stamps: Under the Stars
Ink: Black Stazon
Paper: Whisper White, Old Olive, Early Expresso
Accessories: 1 3/4" & 1 1/4" cirlce punches, 1 3/4" scallop cirlce punch, blender pen, watercolor crayons, Big Shot, Serif Essentials Bigz die, medium cello bags, Chocolate Chip 1/4" ribbon (retired),  linen thread

August 8, 2011

Rolled DSP Birthday Card

I hope everyone had a good weekend. I'm trying to enjoy my last couple of weeks of summer break before school starts, but have so much to do to get my classroom ready! Today the card I made was inspired by a Stamping magazine. I saw this idea on a scrapbook page and decided to make it into a card. I used Early Expresso for my card base and layered a piece of Confetti White on it. I used the Just Add Cake DSP for the rolled pieces at the bottom. A great way to add depth and interest to any card as well as show off the colorful DSP! I wrapped a piece of Early Expresso baker's twine around the pieces of designer paper. I used the cute elephant image from the single stamp Elebration. This set can be used for boys, girls, birthdays, baby showers, etc. Just omit the cake if it's not a birthday card you're making. I stamped him on watercolor paper and cut him out. He is colored with watercolor crayons and a blender pen. I paper pieced the ballon and cake and added some Dazzling Details (available in the new Holiday Mini on Sept. 1st) to both. I used the Scallop square duo bigz die and cut out a piece of Wild Wasabi to layer under the elephant. I used my paper piercing tool and poked holes around the edges of the scallops. The elephant is popped up on dimensionals. I'm happy with how this card turned out!


Thanks for stopping by!

Contact me to order any of the Stampin' Up! supplies you see used here or you would like to become a Stampin' Up! demomstrator.

Stamps: Elebration
Ink: Black Stazon
Paper: Early Expresso, Confetti White, Wild Wasabi, Watercolor paper, Just Add Cake DSP, Blushing Bride, So Saffon
Accessories: Early Expresso Baker's Twine, Scallop Square Duo Bigz Die, Big Shot, Watercolor Crayons, blender pen, dimensionals, paper piercing tool, Dazzling Details

August 5, 2011

Classroom Cubby Name Tags

Here are the cubby name tags I'm making for the kiddos in my class this year. I'm doing a camping theme in my room, so I pulled out the Stampin' Up! set Under The Stars. I really like this set - so cute! I don't have my final class list yet, so I only put names on 2 of the name tags. Only 18 more to go! I colored the bear and raccoon in with Stampin' pastels and cut them out. The names I'm using the sizzix die Wingo Zingo with SU! Confetti White cardstock. Sorry about the pictures. The colors didn't turn out very well. They are supposed to be More Mustard, Pumpkin Pie, and Pear Pizzazz. Not sure why they seem so bright. When I get them all completed I will be laminating them so they last the entire school year.


Thanks for stopping by!

Contact me to order any of the Stampin' Up! supplies you see used here or to become a demonstrator! My contact info is on the left sidebar.

Stamps: Under the Stars
Ink: Early Expresso, Basic Black
Paper: More Mustard, Pumpkin Pie, Pear Pizzazz, unknown patterned paper, Very Vanilla, Confetti White
Accessories: Stampin' Pastels, sponge dauber, Big Shot, Sizzix die Wingo Zingo